

How to Use WordPress Customizer with the Toocheke Theme
All WordPress themes come with the powerful Customizer feature, and the Toocheke theme is no exception. Offering a range of unique customization options, Toocheke makes it easy for you to personalize every aspect of your website’s design, from colors and fonts to layout and beyond. Whether you’re a beginner or an experienced user, the Customizer provides an intuitive interface to help you shape your site exactly how you envision it. In this comprehensive tutorial, we’ll guide you through each of the options that are available in the Customizer with the Toocheke theme.
- Login to your WordPress dashboard.
- Go to the Appearance → Customize menu
- You will be presented with a list of expandable panels. You need to click on the individual panels to make changes to them.
In the following sections, we’ll show you the options available in the WordPress theme Customizer, as well as share some customization tips and alternatives.
If you’re interested in a particular topic, you can click the link to skip ahead in the article:
- Site Identity: Add Title, Logo, and Favicon
- Change Colors on Your Website
- Home Page Layout
- Home Sections
- Main Menu Alignment
- Header Image
- Mobile Header Image
- Header Link
- Comic Page Layout
- Background Image
- Menus
- Widgets
- Sidebar
- Footer
- Homepage Settings
- Additional CSS
- Preview Your Website in Different Screen Resolutions
- Publish Your Customizer Settings
Site Identity: Add Title, Logo, and Favicon
The Site Identity panel in the WordPress theme Customizer allows you to easily update your website’s title and tagline.
By default, WordPress sets the tagline to “Just Another WordPress Site”. We recommend changing this after installing WordPress to better reflect your site’s identity. However, if you prefer, you can leave the tagline blank.
If you wish to hide the Site Title and Tagline you can simply uncheck the ‘Display Site Title and Tagline’ option
In the Site Identity panel, you can also upload your site’s logo. In the Toocheke theme, the logo will be displayed in the navigation bar. For optimal display, the recommended logo size is a height of 45px, with any width. To add your logo, simply click the Select Logo button and upload your desired image.
Want to add a favicon to your site? You can do this by clicking the Select Site Icon option. A favicon is a small graphic that represents your website, appearing in the browser’s address bar, tabs, and bookmarks. It helps users easily identify your site when navigating multiple pages, acting as a visual bookmark for quicker access.
Change Colors on Your Website
With the Toocheke theme, you can easily customize the colors of various components across your web page. For instance, you can modify the text color of the main content area or adjust the background color of your pages. Simply click on the Select Color option to make your changes. Additionally, you can choose from a selection of predefined color schemes in the Base Color Scheme dropdown menu. Each scheme provides a set of coordinated colors for different components, allowing you to update the look of your page without having to change the color of each individual element.
Home Page Layout
The Toocheke theme offers a predefined set of six layout options that you can easily apply to your homepage. Each option includes layouts for both the comic post page and standard pages. These layout choices are divided into two main categories:
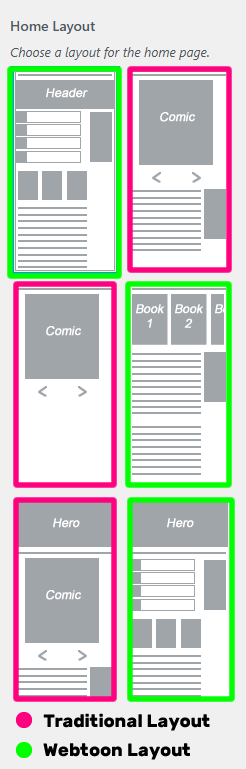
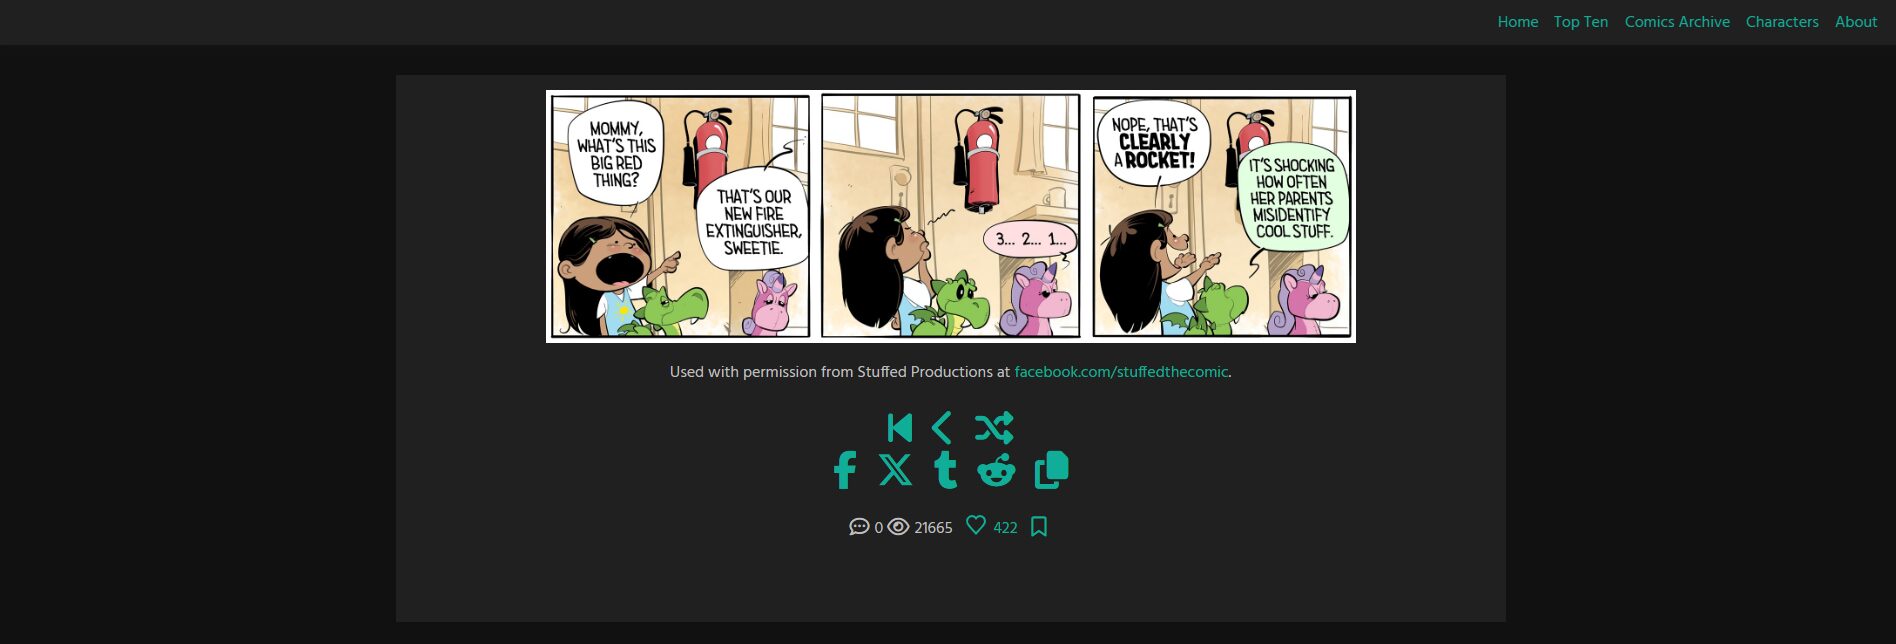
- Traditional Layout – Features the latest or oldest comic displayed on the homepage, with comic navigation, analytics, and sharing options positioned directly below the comic image.

- Webtoon Layout – The homepage showcases multiple sections, including a snapshot list of comics as well as various comic archives
.Clicking on any comic directs you to a mobile-optimfized comic page, where the comic images take up most of the screen, and a thumbnail carousel allows for easy navigation through the archive. The page header displays the comic title along with sharing options, while the footer includes comic navigation and analytics features.

Home Sections
If you’re using one of Toocheke’s Webtoon layouts for your homepage, each section comes with a default title. The Customizer allows you to easily update these titles, or, if you prefer, you can choose to hide any section entirely.
Main Menu Alignment
Do you want to change the alignment of the menu items in your navigation bar? With the Toocheke theme, you can have the navigation menus aligned to the left, center, or right. By default, the items are aligned to the right.
Header Image
Depending on the layout option you choose in Toocheke, a header section will appear on your website. By default, it displays the Site Title and Tagline on a solid-colored background. However, Toocheke gives you the option to replace this with a background image. You can easily upload your desired image through this panel.
Mobile Header Image
Sometimes, the header image you select in the Header Image panel may not display properly on mobile devices due to its dimensions. To fix this, you can upload a separate image to be displayed only for mobile devices.
Header Link
If you’d like to link the header section to a page or external URL, simply enter the link in this panel.
Comic Page Layout
If you want to make the image in your comic post more responsive across devices, one option is to split the image into parts (based on the panels) and choose how many panels to display per row on desktop screens. Keep in mind that on mobile devices, only one image will appear per row, and this cannot be changed. The ‘Comic Page Layout’ panel offers four options, allowing you to control how many panels are displayed per row on desktop screens. By default, one image is shown per row, but you can display up to four panels per row. This works best for comics with uniformly sized panels, such as a daily four-panel comic.
Another option to consider for creating a responsive comic is to uploading two sets of images—one for desktop screens and one for mobile devices – when adding the comic post. This is the recommended method if your panels vary in size. We’ll explain how to do this in a future tutorial.
Background Image
By default, the Toocheke theme uses a solid color for the background on every page. If you want to add a bit more flair, you can easily replace it with a background image. Simply head to the Background Image panel to upload whichever image you wish to use.
Menus
Menus panel allows you to create navigation menus and control where there will be located on your website.
In this tab, you’ll see all the WordPress menus you’ve created in the past. You can click the View All Locations button to explore the menu positions available in Toocheke (currently there is only one location – Primary).
To create a new menu, you need to click on the Create New Menu button.
You can then proceed to give your menu a name so you can easily manage it later. You can also select the menu location and click Next to proceed.
You should now be able to add custom links, pages, posts, categories, and tags as menu items to the respective fields.
If you wish to reorder the items in your menu, simply click on the Reorder link and then use the arrow icons to adjust the menu items.
Also note that you can also manage the navigation menus from the Appearance → Menus page. This will be covered in a future tutorial.
Widgets
WordPress supports a feature called widgets, which are small blocks of content that you can add to your website to display Toocheke features, text, images, links and more. The Widgets panel gives you the ability to add and manage the widgets on your site. Clicking on it will show you the different locations where you can add widgets. The Toocheke theme comes with seven widget sections that you can apply to your page (depending on the layout you have chosen):
- Right Sidebar – this is for content that appears in a box on the right side of the page
- Home Top Content Area – this section displays content on the home page at the top of the main content area on Webtoon layouts and at the top of the content section, on the left, below the comic section for Traditional layouts
- Home Bottom Content Area – this section displays content on the home page at the bottom of the main content area on Webtoon layouts and at the bottom of the content section, on the left, below the comic section for Traditional layouts.
- Above Comic – this section is displayed above the comic image for every comic post.
- Below Comic – this section is displayed below the comic for every comic post.
- Below Header – this section is displayed below the header of every page.
- Above Footer – this section is displayed above the footer of every page.
Although the Customizer is a great option for adding widgets, I recommend using the Appearance → Widgets page for a more intuitive experience. Coupled with the help of the Classic Widgets plugin, I find this method easier for managing widgets. We’ll explore this approach in an upcoming tutorial.
Sidebar
Depending on the layout option you select in the Toocheke theme, a sidebar is included by default on every page. If you’d prefer to hide the sidebar and override the layout, simply select the option in the Sidebar panel.
Footer
At the bottom of your website, Toocheke includes a footer section that appears across all pages. By default, it displays the text “(c) Toocheke.” Typically, you would use this section for displaying copyright and branding information. You can easily customize the footer content by editing the text in the Footer panel.
Homepage Settings
By default, WordPress displays an autogenerated homepage from the Toocheke theme. However, you may prefer to use your own custom homepage. To do so, you would select the A static page radio button on the Homepage Settings panel. This will display two dropdown menus that you can use to select a page for your homepage and another for displaying your blog posts.
If you have not yet created the pages on your website, you can create a new one by clicking on the + Add New Page link below the dropdown menu. This will create a blank page with the name of your choice.
Additional CSS
If you are comfortable with writing CSS code, you may wish to override some of the styles that come with Toocheke or add extra styles. The Additional CSS panel is the quickest and easiest way to do this. Any CSS added in this panel takes precedence over any CSS styles on your website. Adding custom CSS with the Customizer gives you the added benefit of seeing your updates live (on the right side of your screen) as you make updates.
Preview Your Website in Different Screen Resolutions
One of the cool benefits of using the Toocheke theme is that it is responsive. Which means that the webpage adapts to whichever device the website is being viewed from. Thanks to the Customizer for WordPress, you can preview how your website looks in different screen sizes.
At the bottom of the Customizer panel, you’ll find three icons and the Hide Controls link. The icons allow you to test your site on different devices like desktop, tablet, and mobile. You can use the Hide Controls link to hide the WordPress Customizer panel so that you can view your site properly on a desktop.
Publish Your Customizer Settings
After you have made all the updates you need to make within the Customizer, you will need to apply them to your site. Otherwise, you will lose all the updates you made. To apply the changes, make sure you click on the blue Publish button. Once your changes are saved, you can click on the close button at the top-left corner of your screen to exit the Customizer.
The WordPress Customizer makes tweaking Toocheke a breeze, so you can easily make it your own and have fun while doing it!
Happy Tooning!


