🚀 How to Supercharge Your WordPress Site with W3 Total Cache and Cloudflare
- Cache, Cloudflare
Is your WordPress site taking its sweet time to load? Don’t worry—you don’t need to be a developer to fix that with just a few simple tools. With W3 Total Cache and Cloudflare, you can transform your sluggish site into a speed demon—and we’re going to show you how, step by step.
Before we dive in, let’s take a quick pit stop and understand two key players in boosting the speed of your website: caching and CDNs.
💾 What is Caching?
Think of caching like your browser’s memory. Instead of asking your server to rebuild a page from scratch every time someone visits, caching stores a ready-made version of the page. That way, the server doesn’t have to do all the heavy lifting repeatedly—saving time and speeding things up.
🌎 What is a CDN (Content Delivery Network)?
A Content Delivery Network, or CDN, is a global network of servers that delivers your website content from the server closest to the visitor. It’s like having multiple mini-versions of your site spread around the world, so users get faster load times no matter where they are.
🔧 Step-by-Step: Speed Up WordPress with W3 Total Cache + Cloudflare
To boost your website’s performance with caching and a CDN, we’ll be using a powerful duo: W3 Total Cache and Cloudflare. W3 Total Cache is one of the most trusted and feature-rich caching plugins for WordPress, while Cloudflare is a leading CDN provider known for its speed, security, and global network reliability. Together, they create a fast, efficient, and scalable setup for any WordPress site.
Installing and Setting Up W3 Total Cache
1️⃣ Install and Activate W3 Total Cache
- Go to Plugins → Add New in your WordPress dashboard.
- Search for W3 Total Cache.
- Click Install Now and then Activate.
After activation, you’ll see a new Performance tab in your dashboard menu.
2️⃣ Configure Settings With the Setup Guide
Now that W3 Total Cache is installed, it’s time to configure the settings to get your site running at top speed. The easiest way to get started is by using the setup wizard—it walks you through everything step by step. Just click on the Performance menu link, which you’ll find in both the left-hand sidebar and the top admin menu (see screenshot below).

You can then proceed to enter the settings on each screen as follows:
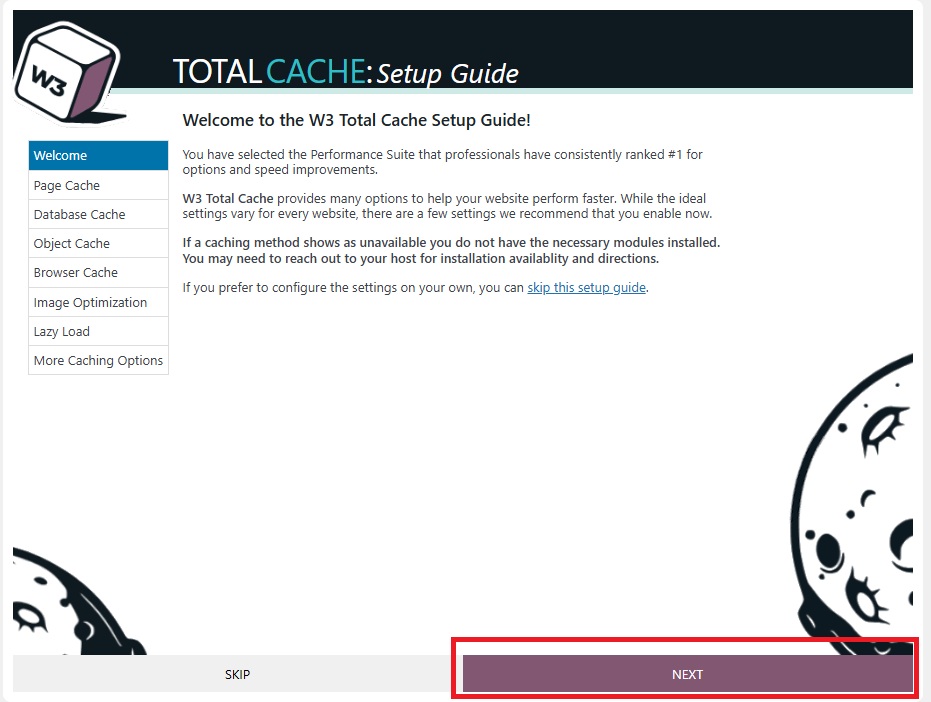
✅ Welcome
- You can chose to either accept or decline to allow W3 Total Cache to collect data, then click the NEXT button.

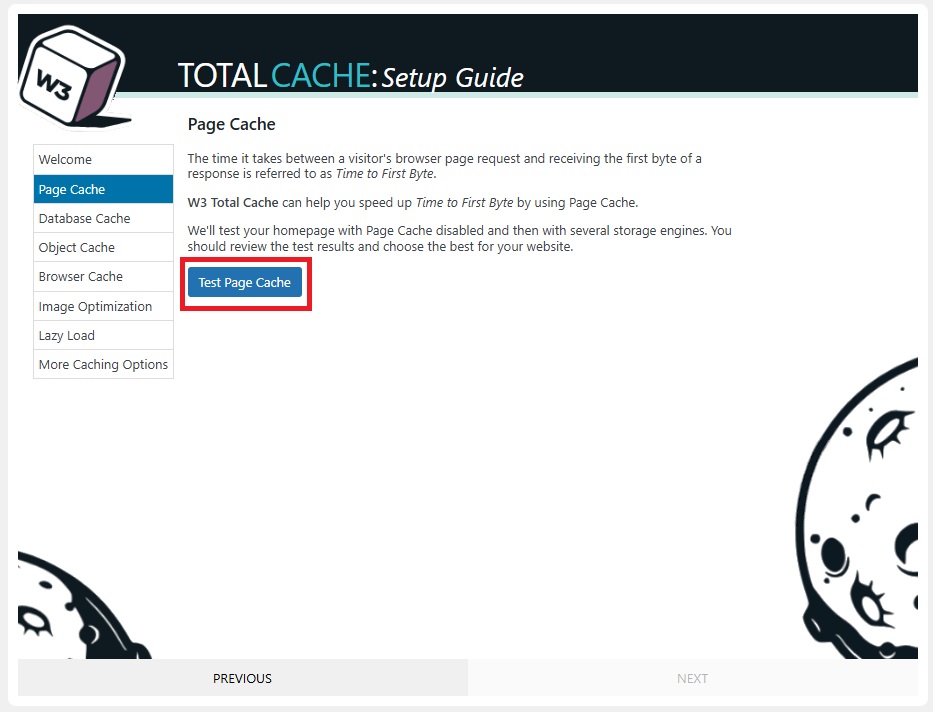
✅ Page Cache
- Click on the Test Page Cache button.

- Select the storage engine that performed the fastest and then click on the NEXT button.


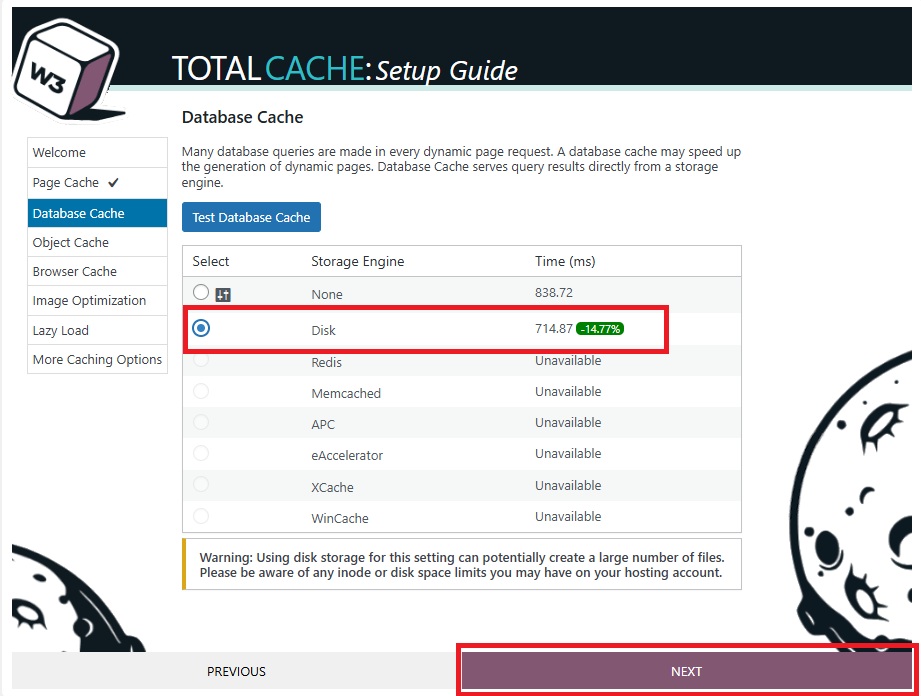
✅ Database Cache
- Click on the Test Database Cache button.

- Select the storage engine that performed the fastest and then click on the NEXT button.


✅ Object Cache
- Click on the Test Object Cache button.

- The Disk option will most likely come up as fastest storage option. However, I would advise against enabling this option especially if your WordPress website is hosted on a shared environment. It tends to cause performance issues with excessive disk writes. Also it has been known to cause compatability issues with plugins and themes. So leave it set as None.


✅ Browser Cache
- Click on the Test Browser Cache button.

- Select ‘Enabled’ to enable the Browser Cache and click NEXT.


❌ Image Optimization
Since you already are handling image optimization with EWWW Image Optimizer as covered in this tutorial, just click the NEXT button
❌ Lazy Load
It’s best to skip this one too. While lazy loading can improve performance in some cases, it often causes more issues than it solves—especially with layout shifts and plugin conflicts. Click NEXT to move on.
🙌 W3 Total Cache Guided Setup Complete.
Nice work—you’ve successfully finished setting up W3 Total Cache. Your site is now equipped with powerful caching to help it run faster and more efficiently.

Signing Up For Cloudflare
Now let’s take your site’s performance to the next level by connecting W3 Total Cache to Cloudflare. This powerful combo helps speed up your website even more by combining caching with a global content delivery network.
Step 1: Sign up to Cloudflare
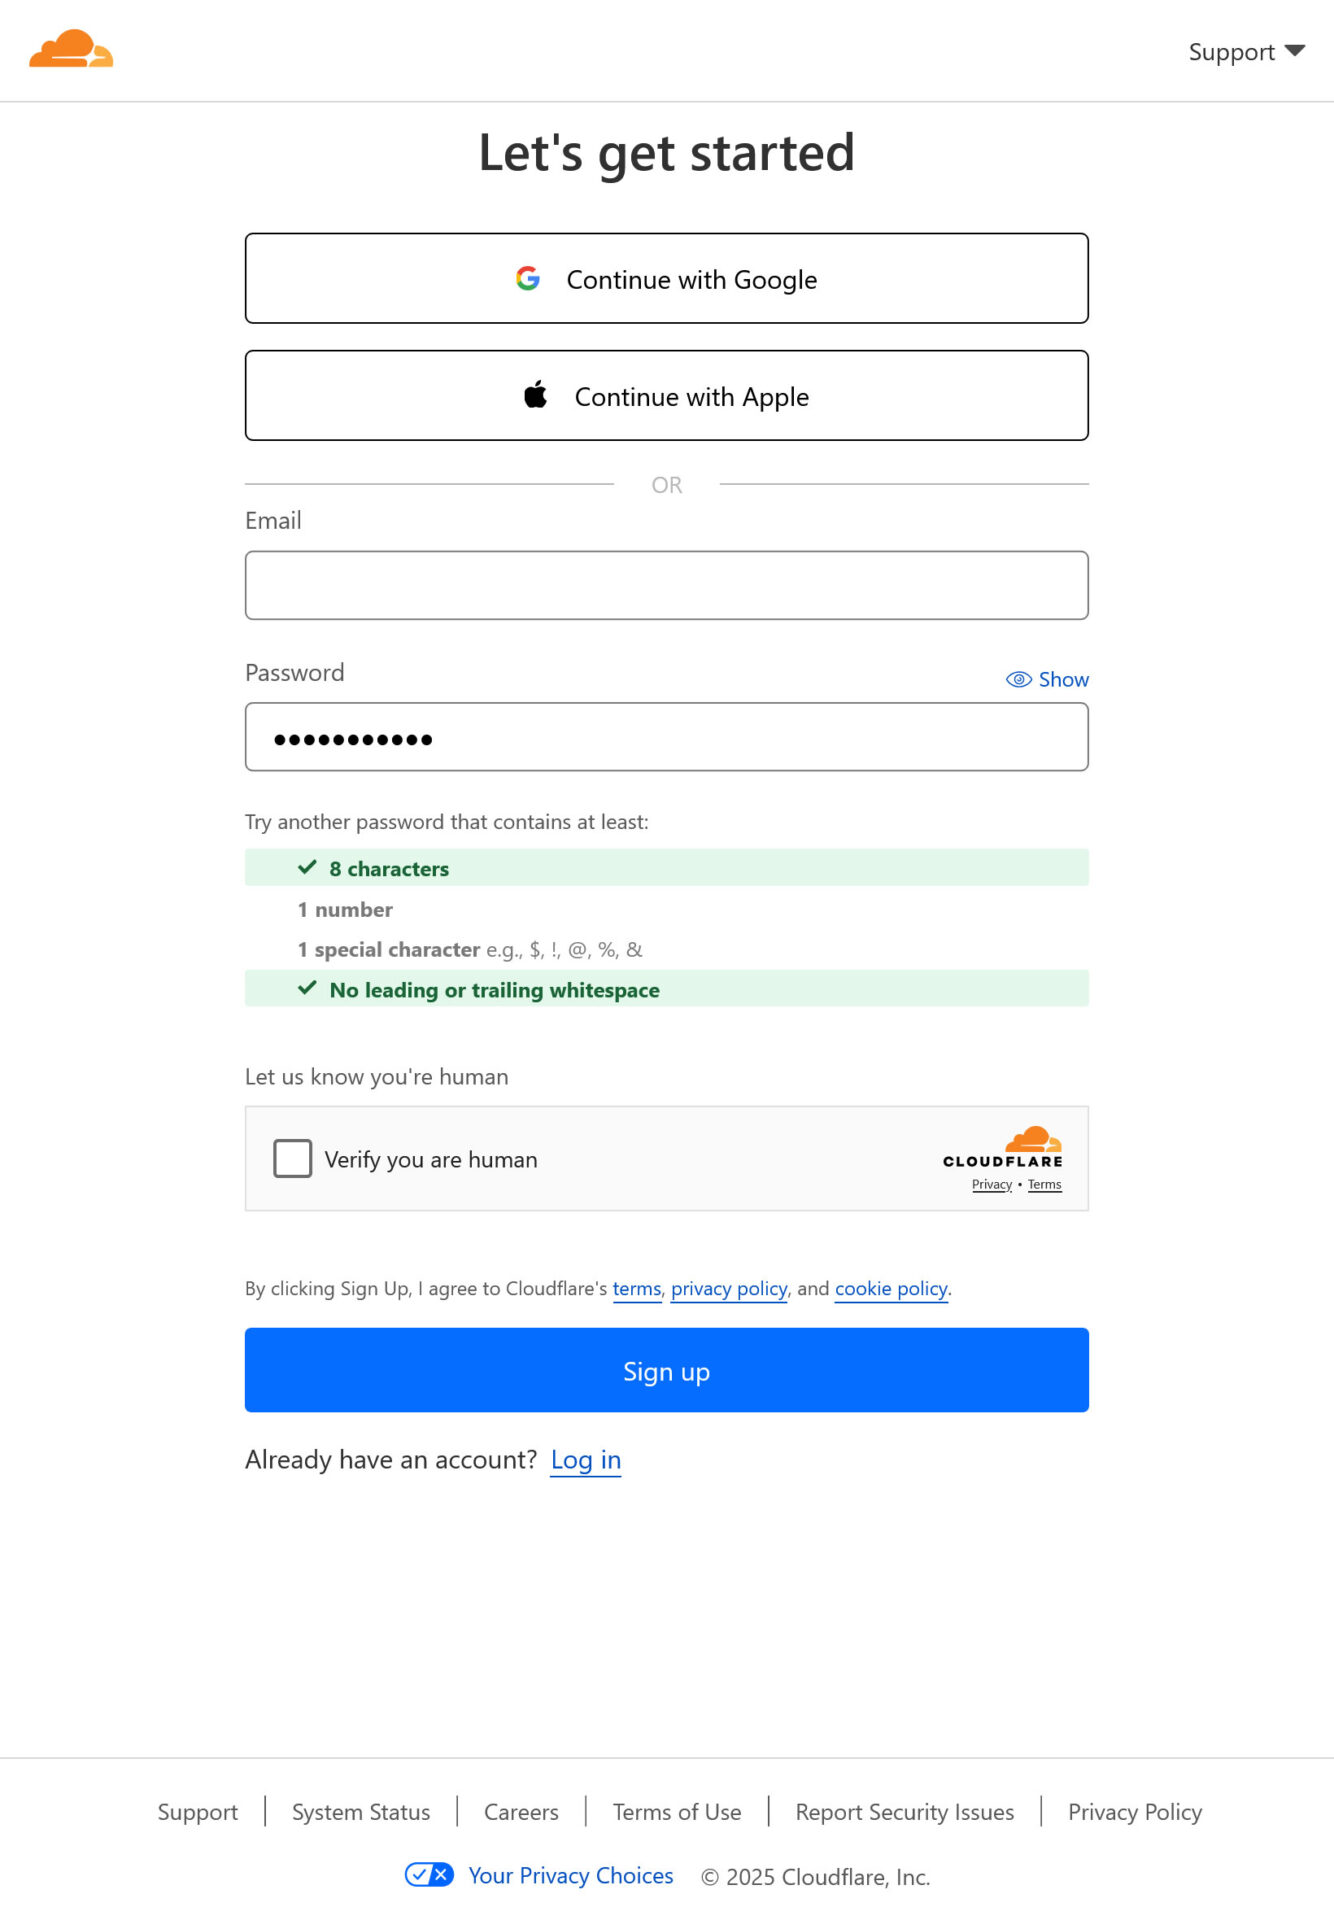
- Visit cloudflare.com, to sign up for an account. If you already have a CloudFlare account, log in to your existing account, otherwise click the Start for Free button

- If If you’re signing up with an email and password, be sure to choose a strong, unique password to keep your account secure. While Cloudflare does offer the option to log in with Google or Apple, we recommend creating a dedicated password instead.
Why? Because many advanced features in Cloudflare—such as API access and certain security settings—require password authentication. Having your own login credentials will save you trouble later on.

Step 2: Click ‘Get Started’ to setup Cloudflare
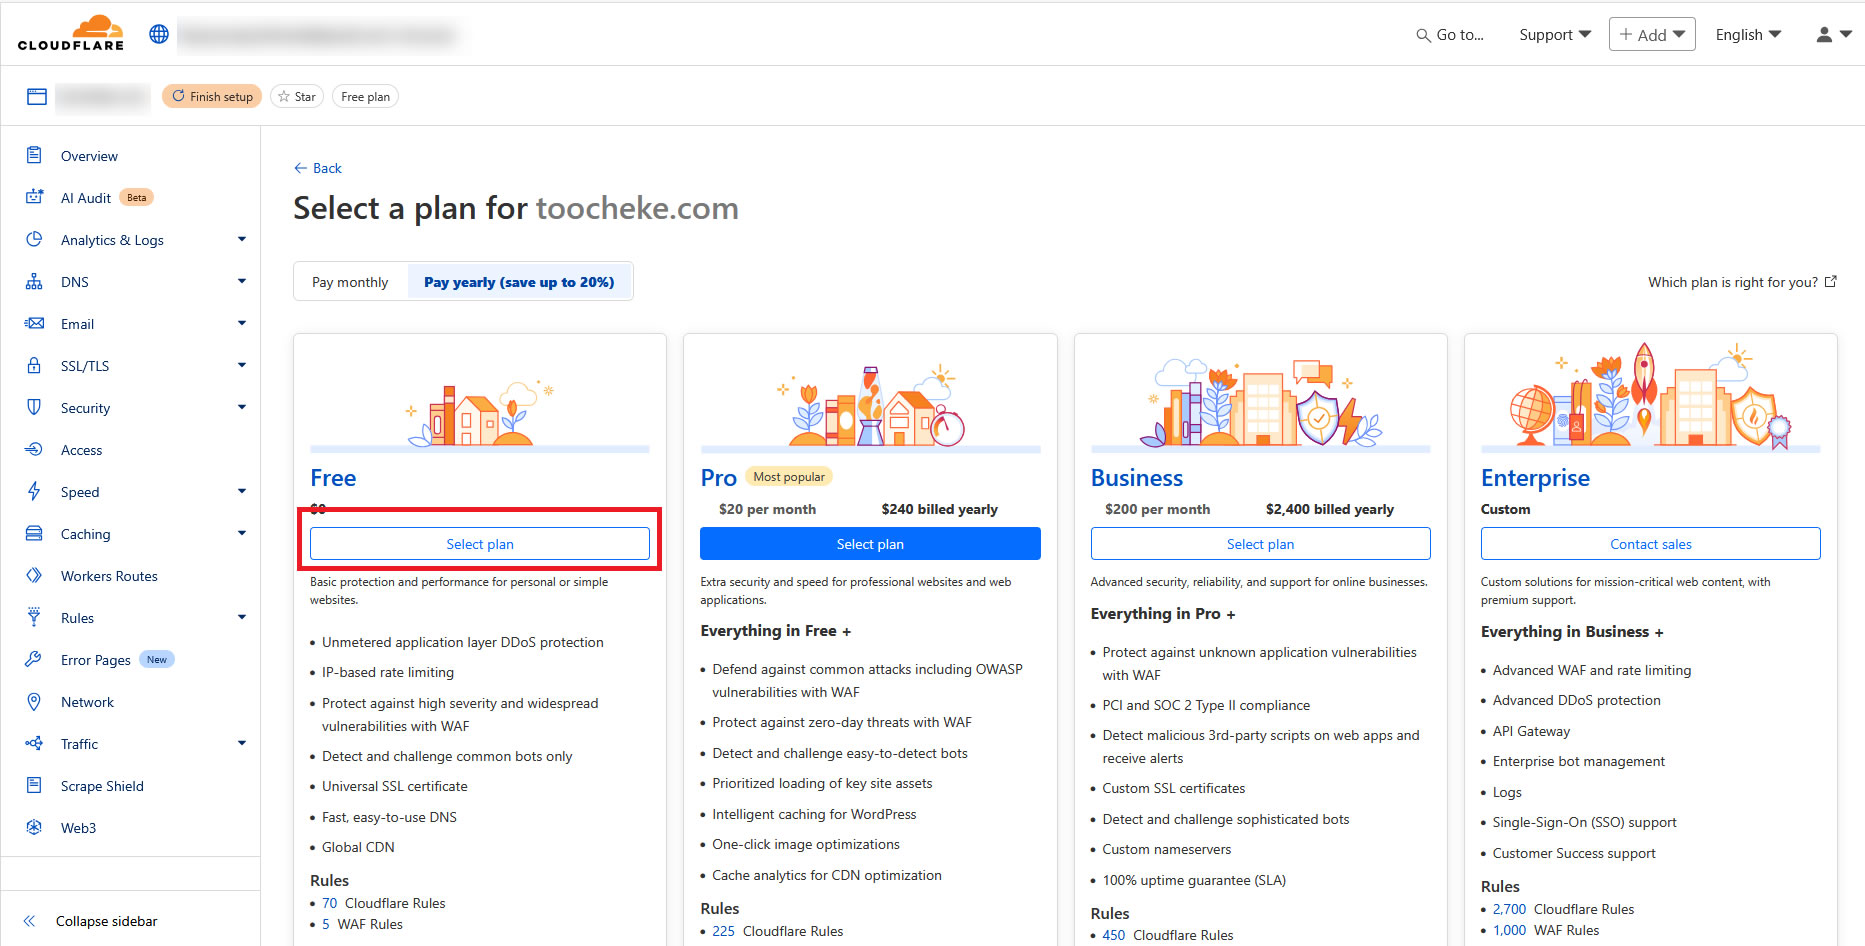
- Once you sign up to your Cloudflare account, you should be automatically be redirected to the Account Home page. Enter the domain name of your website, leave the Quick scan for DNS records option selected and then click on the Continue button.

- Click on the Select Plan button for the Free plan

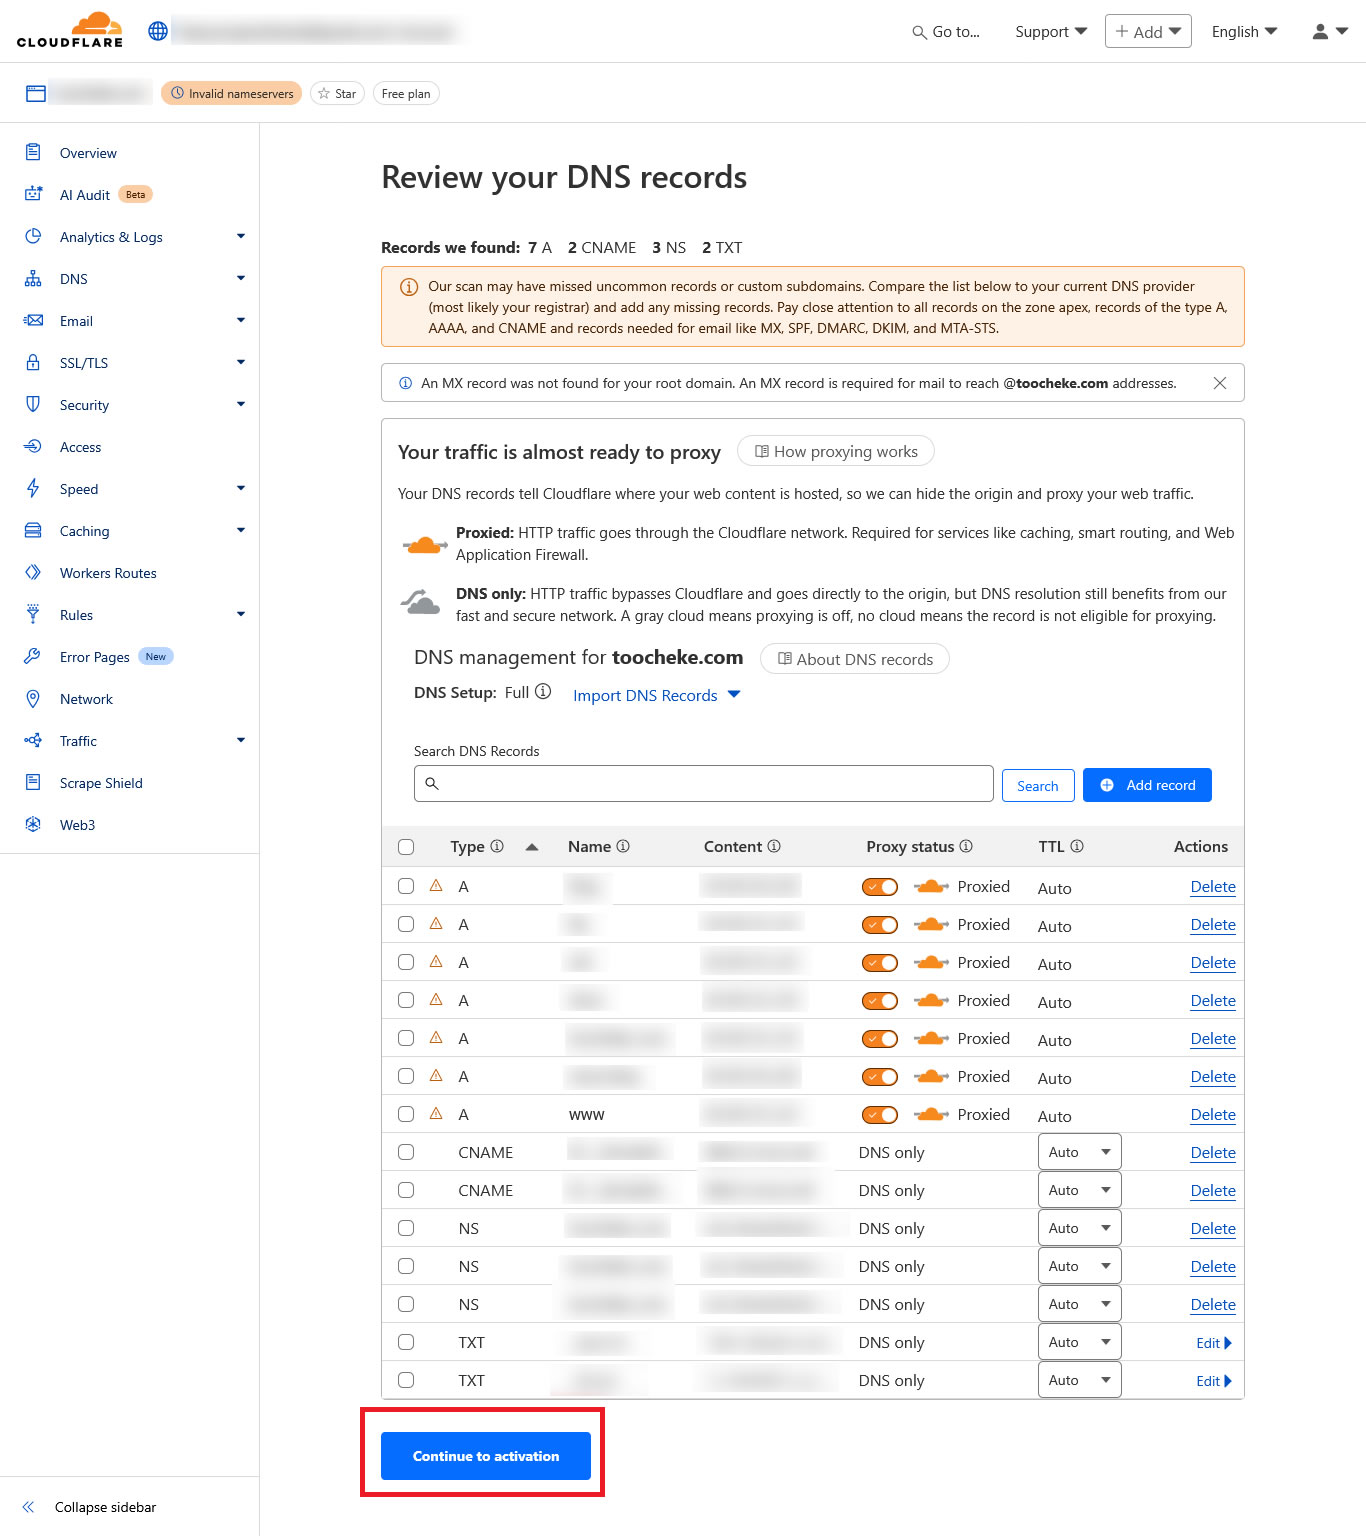
- Cloudflare will scan your current Domain Name System(DNS) records for your domain name and automatically import them. Confirm that all your current records have been imported and click the Continue to activation button


Step 3: Update your nameservers to activate Cloudflare
Once you click on the Continue to activation button, you should be redirected to the final step that displays your current nameservers and simple step-by-step instructions on how to add the new Cloudflare nameservers to your domain registrar.
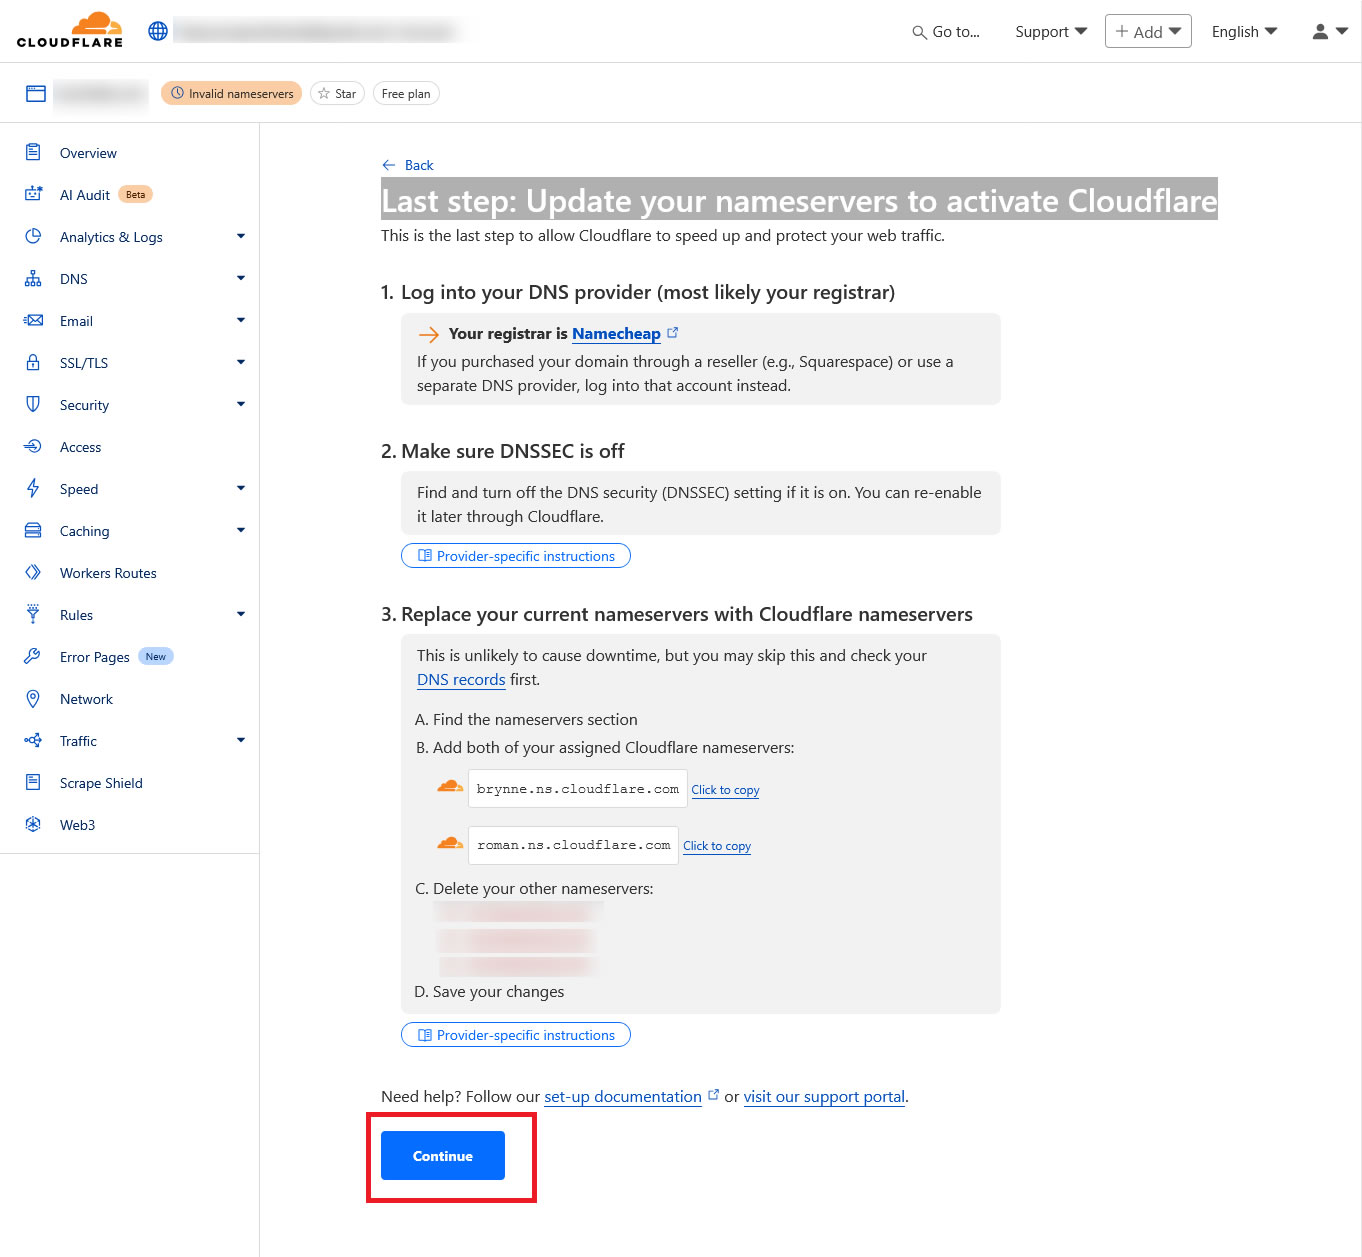
You will need to login to your domain registrar account to make the nameserver updates.If you’re unsure how to make the change, don’t hesitate to contact your domain registrar’s support team—they’ll be able to guide you through the process.
Once you have made the change at your domain registrar, click on the Continue button to finish off the activation process.
Typically, registrars take up to 24 hours to process nameserver changes (quicker in most cases). Cloudflare will email you when your domain name is active on Cloudflare
Step 4: Configure how Cloudflare Encrypts Your SSL
To make sure your site stays secure and plays nicely with your host’s SSL certificate, you’ll need to configure Cloudflare’s SSL settings.
Here’s how:
- In your Cloudflare dashboard, select your domain.
- Go to SSL/TLS → Overview.
- Set the SSL mode to Full (Strict) — this ensures end-to-end encryption between your visitors, Cloudflare, and your web server.
- If a confirmation window appears, simply click Confirm.

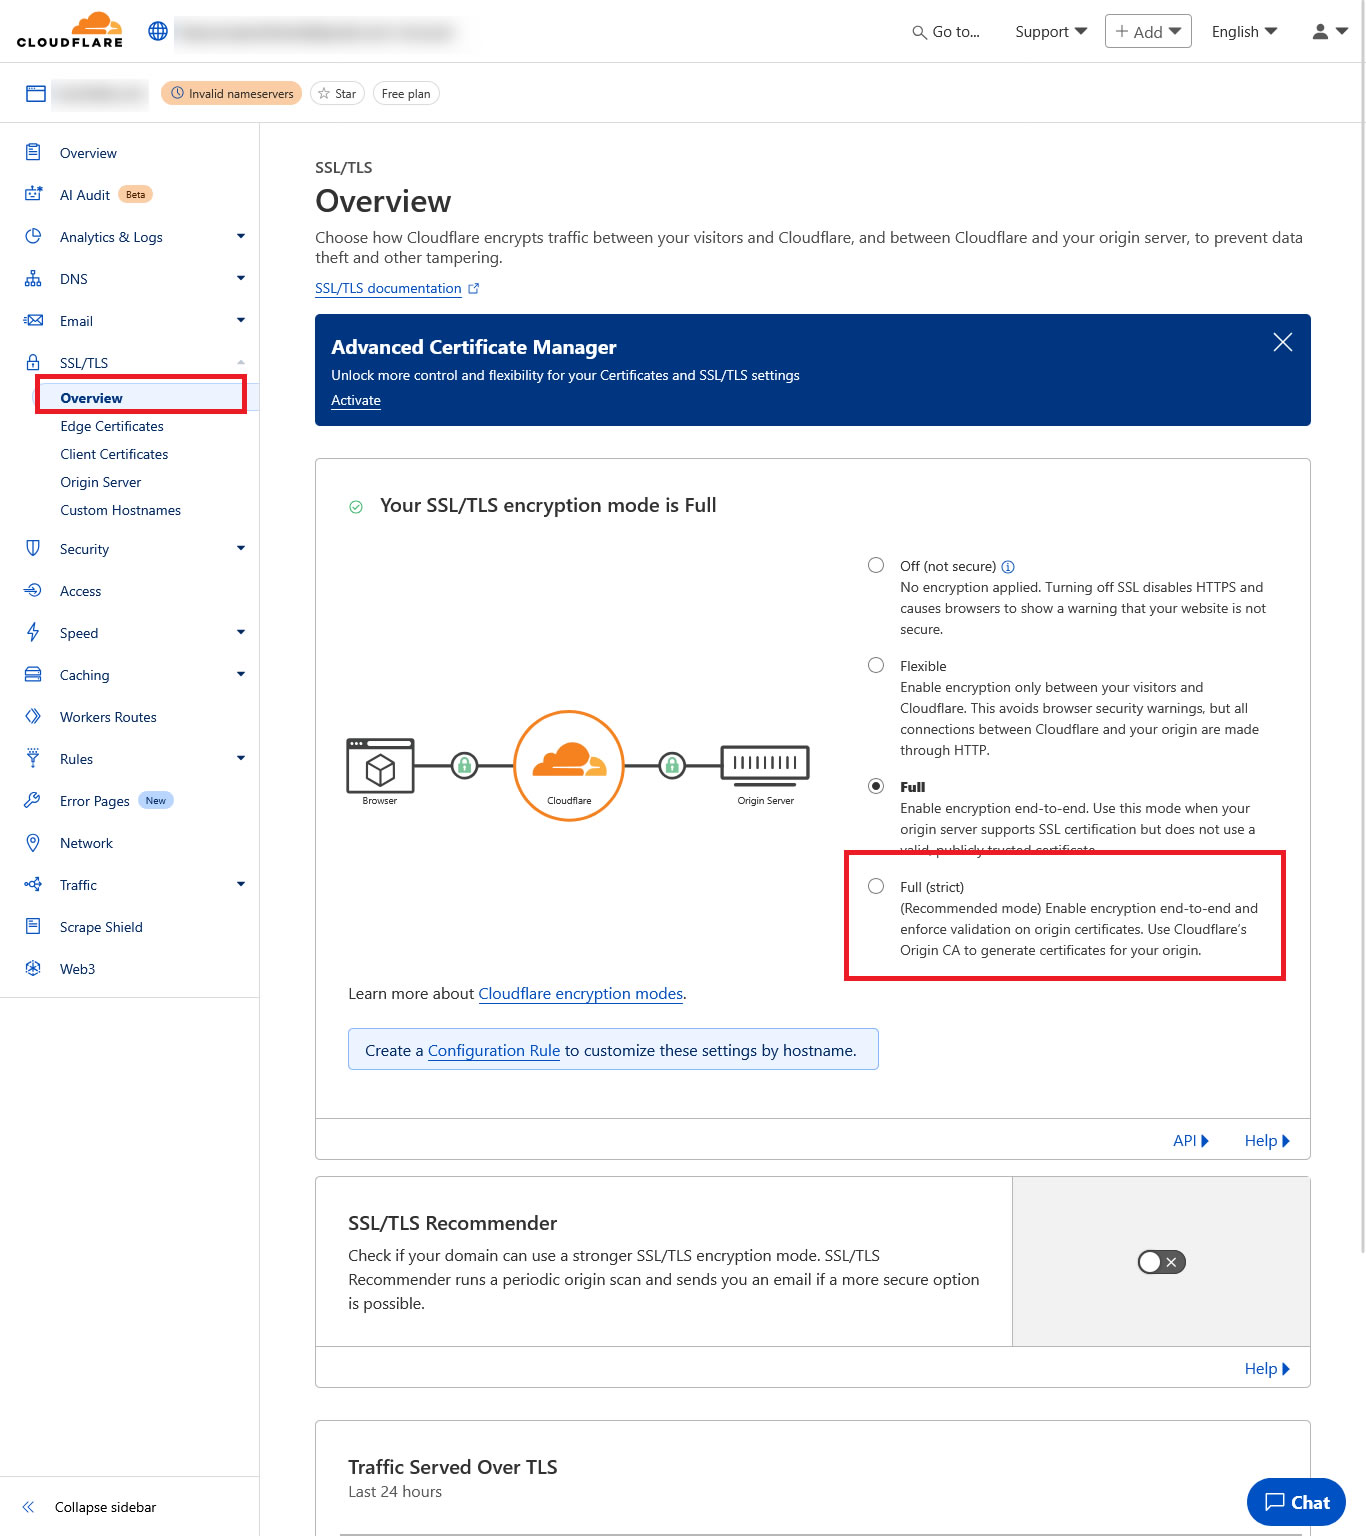

This setting helps avoid SSL conflicts and keeps your visitors’ connections fully encrypted.
Step 5: Configure Caching on Cloudflare
Since we have already configured the browser cache from within W3 Total Cache, we need to tell Cloudflare to respect the existing headers.
- Under the Caching Menu item, click Configuration.
- Select “Respect existing headers” under the Browser Cache TTL option.


🚨 Confirm that your website is active on Cloudflare
Wait to receive the notification from Cloudflare that your website is active before proceeding to the next step.
Connecting W3 Total Cache to Cloudflare
Now that Cloudflare is set up, the next step is to connect it to W3 Total Cache so your WordPress site can take full advantage of Cloudflare’s speed and security.
Here’s how to do it from your WordPress dashboard:
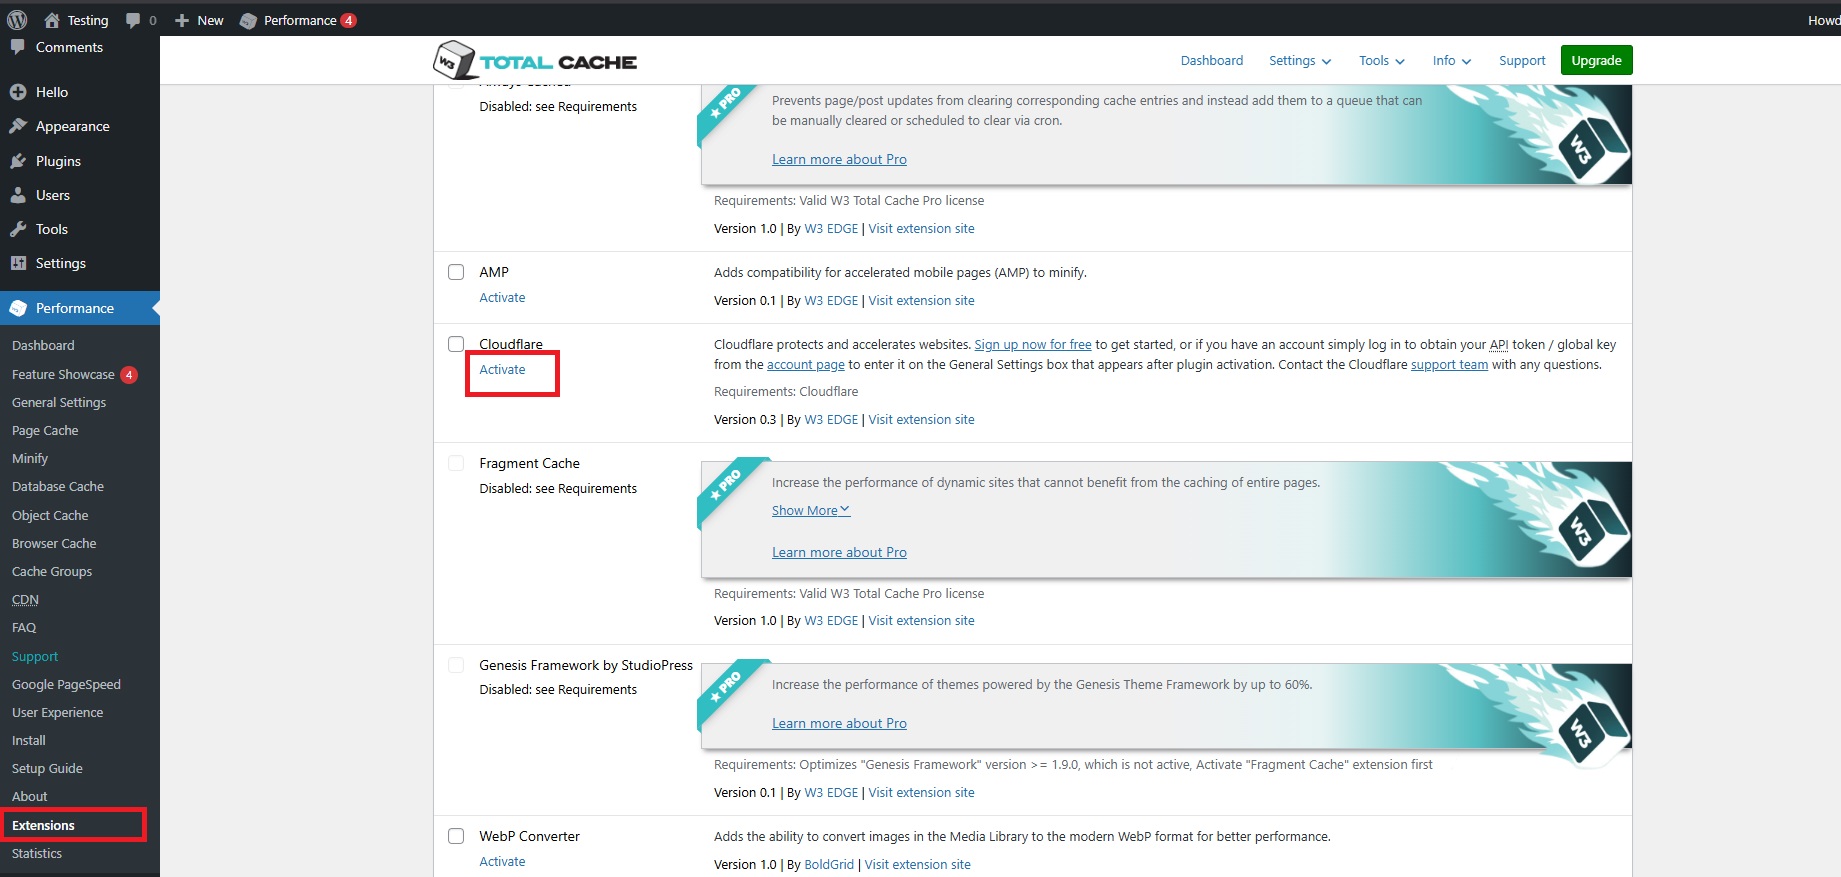
- Go to Performance → Extensions.
- Activate the Cloudlfare extension

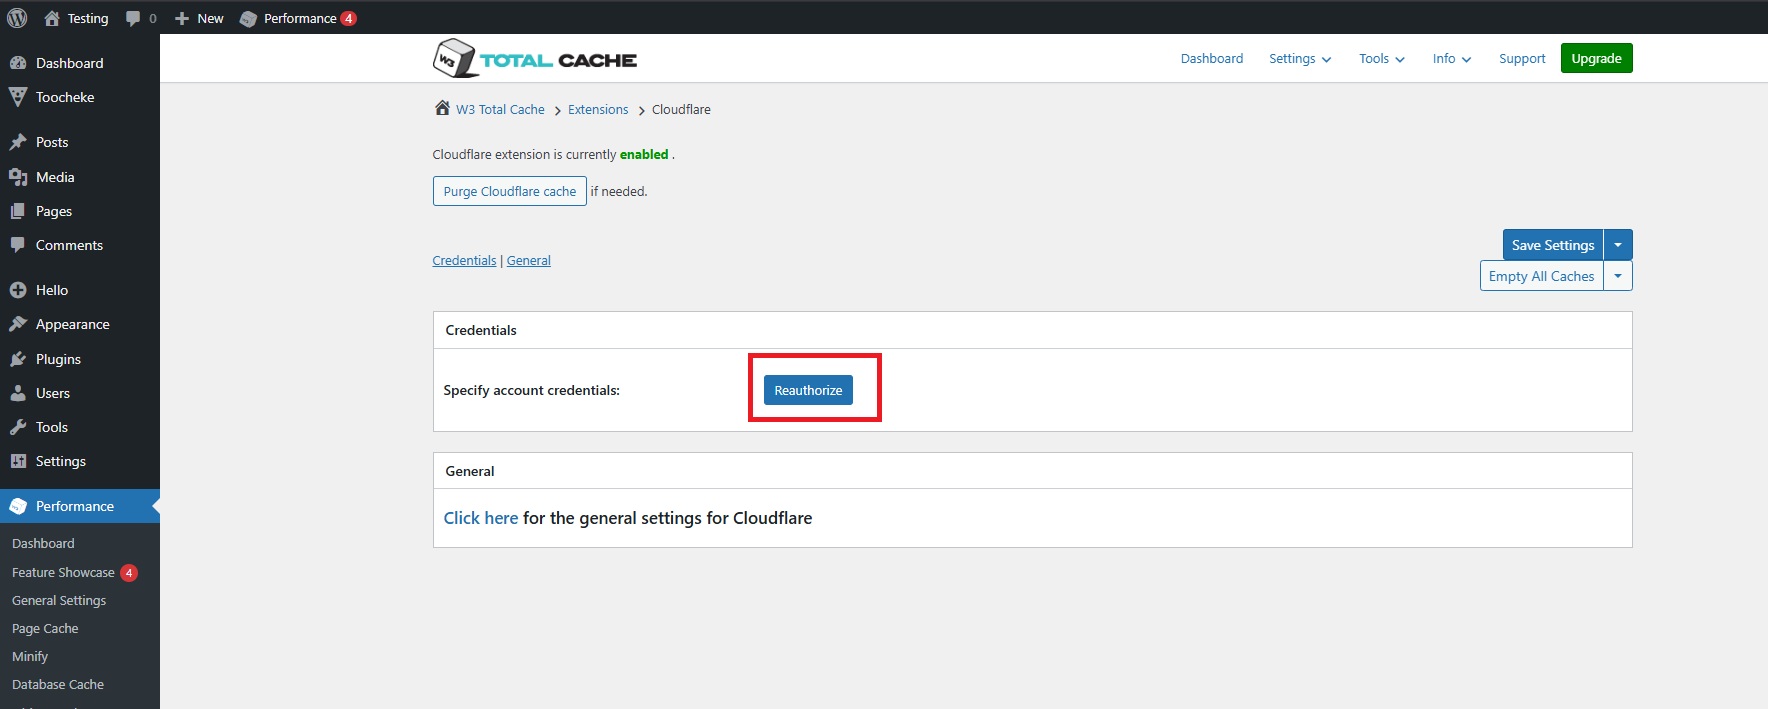
- Click Settings: View all the CloudFlare extension settings.

- Authenticate your account by clicking the Reauthorize button.

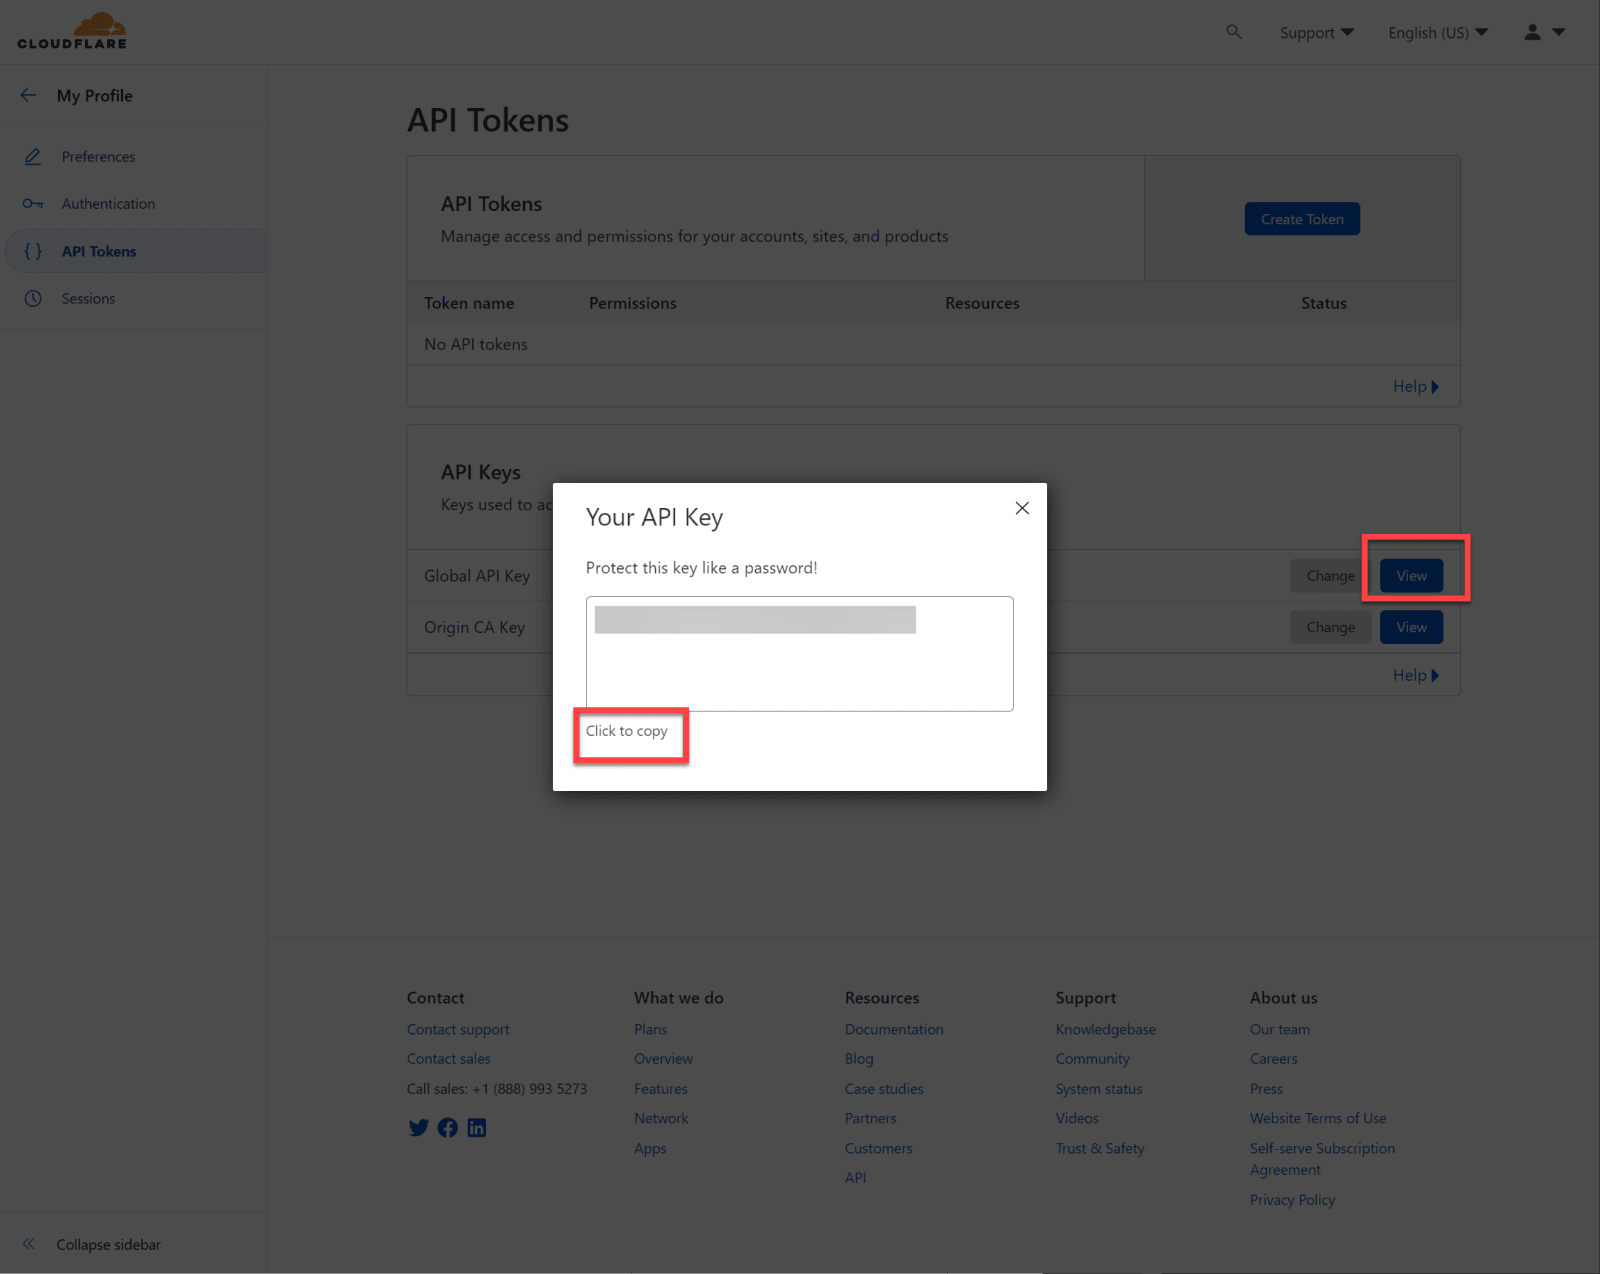
- Click this link to go to your API management screen: https://dash.cloudflare.com/profile/api-tokens
- Click the View button next to the “Global API Key.”
- Enter your CloudFlare password to view your API keygen
- Copy your API key (keep it safe)

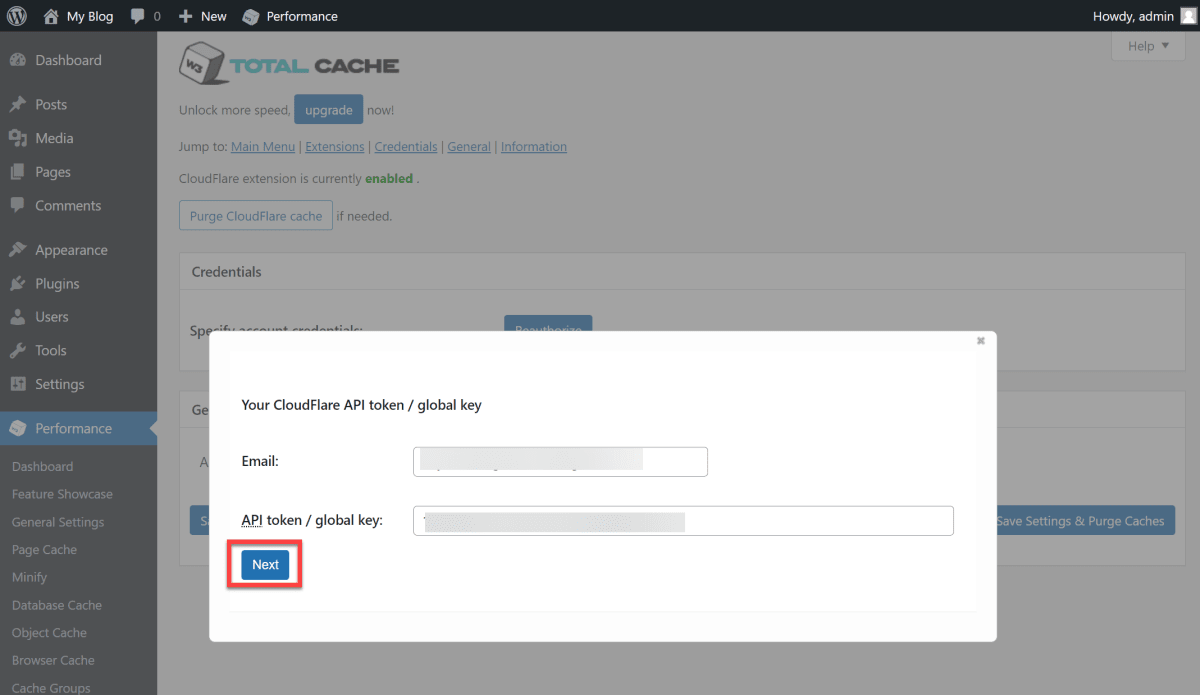
- Head back to the browser tab where your WordPress dashboard is open—specifically the screen prompting you to Reauthorize.
- Enter your Email and paste the API Key you copied earlier and click Next.

- Select your domain from the list, and click Next.


🍾Congratulations. You have successfully configured W3 Total Cache with CloudFlare
If you made it to the end—nice work! That was time well spent.
Your WordPress site is now faster, more efficient, and better protected against malicious traffic. Plus, that speed boost doesn’t just improve user experience—it also gives your SEO a healthy lift.
That’s a serious win. 🚀
🎉 Final Thoughts: Speed is Just the Start
By combining W3 Total Cache with Cloudflare, you’ve just given your WordPress site a serious turbo boost. Visitors will enjoy faster load times, search engines will love your improved performance, and your server will breathe a sigh of relief.
So go ahead—celebrate a little. Your site isn’t just faster; it’s smarter. And if you ever need to tweak your settings or troubleshoot, just bookmark this post.
🔁 Bonus Tip: Clear Your Cache Regularly
Whenever you make major updates to your theme or plugins, be sure to clear your caches:
- In W3 Total Cache, click Performance → Dashboard → Empty All Caches
- In Cloudflare, go to Caching → Configuration → Purge Everything
📌 TL;DR
- Caching = Faster Load Times by serving saved versions of your pages.
- CDN = Global Speed Boost by loading your site from nearby servers.
- W3 Total Cache + Cloudflare = Best Free Combo to speed up your WordPress site.
Happy Tooning!