


🎯How to Set Up Sponsor Ads with Toocheke
Have you ever dreamed of your webcomic being “brought to you by…” someone who actually wants to support your art? Maybe a small business, a loyal fan, or just a friend who thinks your comic deserves a spotlight? Well, dream no more—Comic Sponsorship Ads are here, and they’re as fun and easy to set up as your next punchline!
With Toocheke Premium’s new Sponsorship feature, you can start accepting paid ad bookings directly on your comics. It’s seamless, automated, and completely creator-controlled. You get to approve each request, set your own price, and collect payments securely with PayPal.
Let’s dive into how to get everything set up!
💎 Heads up! This is a Toocheke Premium Feature
This tutorial applies only to the Toocheke Premium theme—the free version does not include the sponsorship feature. If you’re still on the free version and want to start earning from your comics:
Now, let’s get started!
🛠️ Setting Up Comic Sponsorship Ads: Step-by-Step
Step 1: Login to your WordPress Dashboard
Head to your WordPress site and log in as the admin.
Step 2: Refresh Your Theme Setup
If you’ve already installed Toocheke Premium before, you’ll want to temporarily switch to another theme just for a moment.
- Go to Appearance → Themes
- Activate a default WordPress theme like Twenty Twenty-Five
- Then, immediately switch back to Toocheke Premium (or its child theme if you use one)
This ensures all the necessary pages for comic sponsorship are automatically generated, including the booking page.
Step 3: Configure Sponsor Options
Head over to:
Toocheke → Options → Sponsor Comic
Here, you’ll need to fill out two key areas:
➤ PayPal Settings
Enter your PayPal Client ID and Client Secret (we’ll show you how in a moment).
💡 Tip: There’s a Sandbox Mode checkbox here. Only use this if you’re doing test payments. For real sponsors, leave it unchecked!
➤ Pricing
- Choose your currency
- Set your price per day for sponsorship ads
Step 4: Get Your PayPal API Credentials
- Open a new browser window and go to: https://developer.paypal.com/
- Login with your PayPal Business Account
Once logged in:
- Navigate to Dashboard → My Apps & Credentials
(or click here directly once logged in) - Choose between Sandbox or Live mode using the toggle button as shown in the screenshot below:

- Click the Create App button
- Name your app (e.g., MyWebcomicApp)
- For Sandbox testing, select a sandbox business account
- Click Create App
- You’ll now see your Client ID and Client Secret
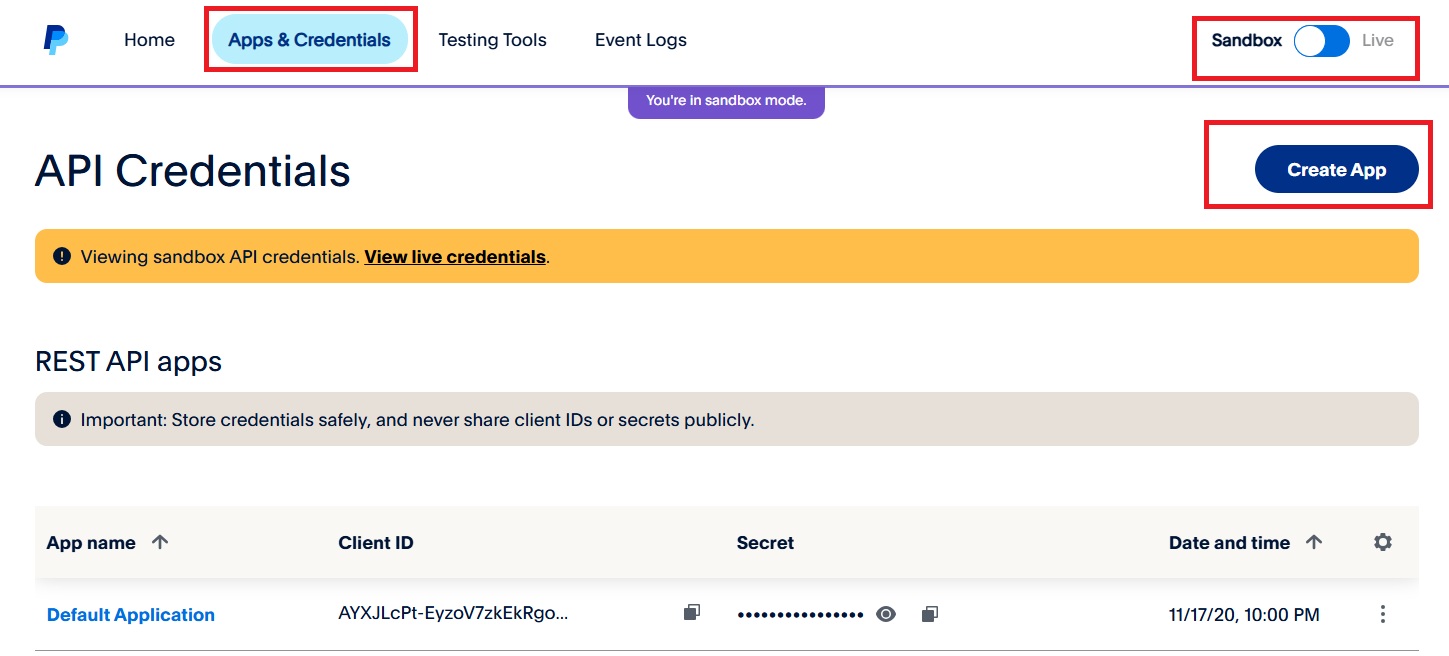
Copy both of these.
Step 5: Paste Credentials & Set Pricing
Go back to your browser window with the Sponsors Option page open in your WordPress dashboard:
- Paste your Client ID and Secret into the respective fields
- Set your desired Currency and Price per day
- Click Save Changes
🎉 You’re now ready to accept comic sponsorship bookings!
🎨 How to Display Sponsored Banner Ads on Comic Posts
Once you’ve enabled sponsorships and approved bookings, you’ll want to display the sponsor’s banner ad directly on your comic pages. Here’s how to do it:
1. Login to your WordPress Dashboard
Start by logging into your WordPress admin area.
2. Go to Appearance → Widgets
In the left-hand sidebar, navigate to Appearance → Widgets. This is where you control the layout and content blocks of your theme.
3. Add the Sponsorship Shortcode
Find either the Above Comic widget aread or the Below Comic widget area, then:
- Add a Shortcode widget to that area.
- In the content field, paste the following shortcode:
[comic_sponsorship_ad]
This shortcode automatically fetches and displays the appropriate desktop and mobile banner ad images for today’s date — only if a sponsorship exists.
4. Save Your Changes
Click the Save button on the widget to apply your changes.
That’s it! Sponsored ads will now automatically appear on your comic posts on the scheduled days — no manual updates needed.
📅 Where Can People Book a Sponsorship?
The booking page is automatically created and accessible at:
https://www.yourdomain.com/sponsor/
(Just replace yourdomain.com with your real domain)
When someone fills out the form, their request will be marked as Pending—you’ll need to approve it before their payment is processed and their ad goes live.
✅ Approving a Sponsorship Request (Manual Step)
When a sponsor submits a request, you’ll receive an email notification. Here’s how to approve it:
Step-by-Step:
- Login to your WordPress Dashboard
- Go to Toocheke → Comic Sponsorships
- Find the sponsorship request in the list
- Change the status to “Approved” (see screenshot below)

- Click the Update button
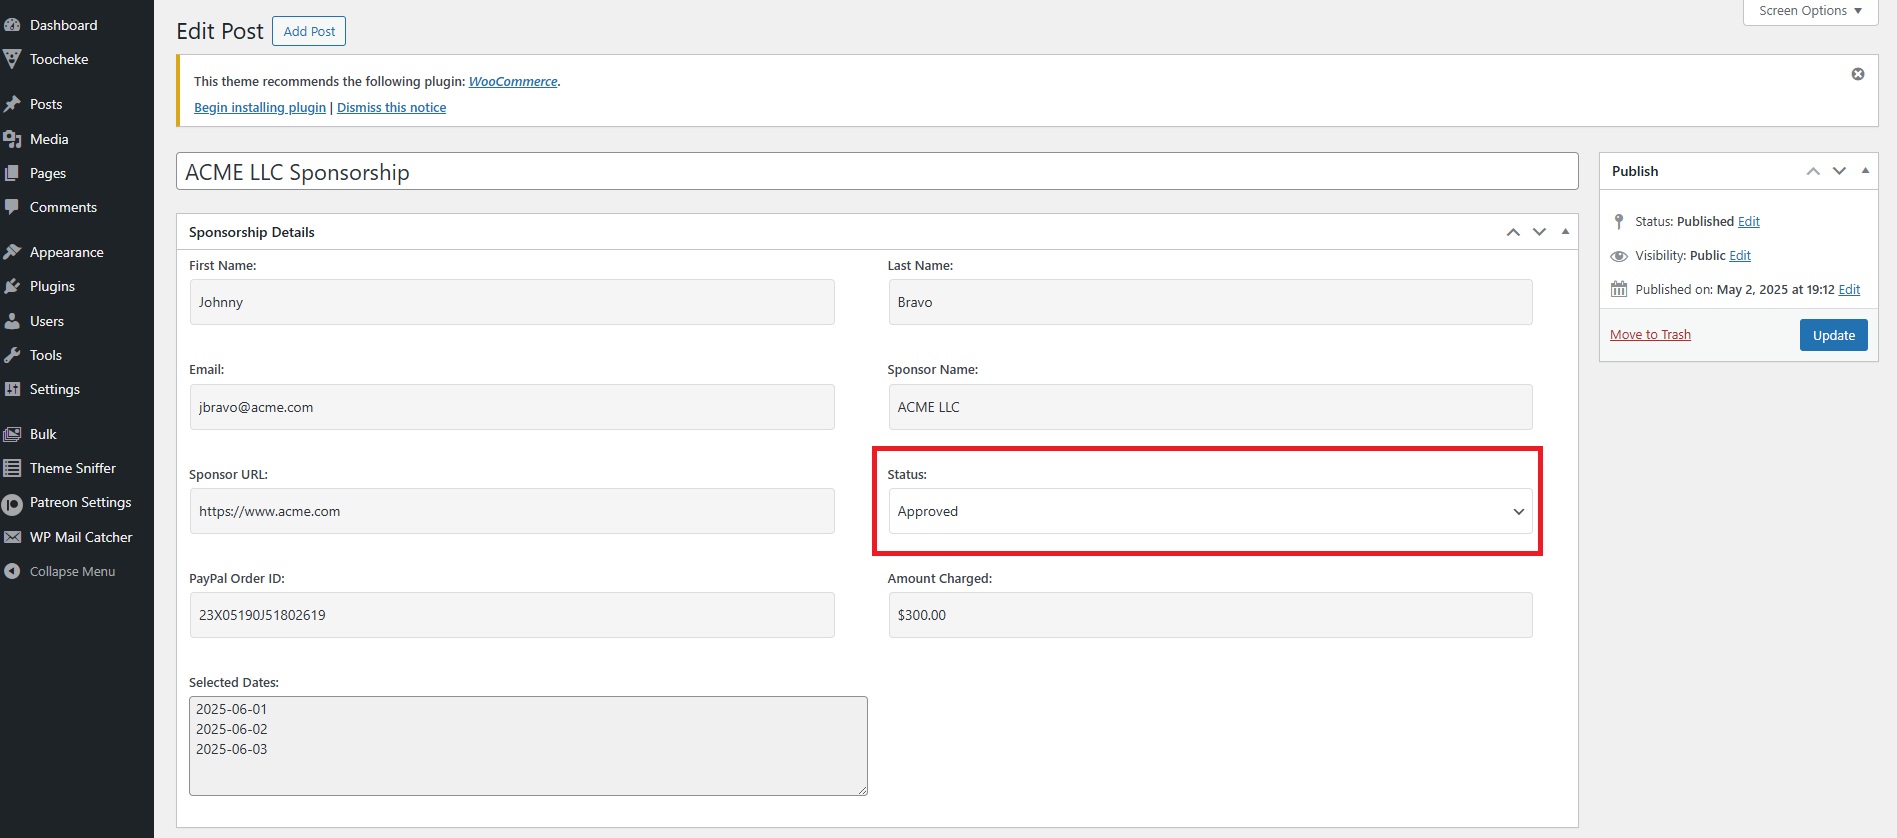
Once approved:
- The sponsor’s PayPal account is automatically charged
- Their banner ad will start showing on your comic on the dates they selected
- If the payment fails, you’ll need to request that they resubmit the form
😍 It’s that easy!
🚀 Ready to Start Monetizing Your Comic?
With just a few clicks, you’ve turned your comic into a fan-powered ad platform that earns money while you keep doing what you love—drawing and publishing!
To use this feature, make sure you’re running Toocheke Premium:
👉 Get it now if you haven’t yet
Have questions? Need help? We’re here for you. Reach out anytime!
Happy Tooning!

