

How to Add a Navigation Menu to Your WordPress Website
Adding a navigation menu to your WordPress website might sound like one of those “techy” tasks that only web developers can handle, but fear not—it’s actually easier than you think! Whether you’re building your site from scratch or just want to tidy up the layout, a well-organized navigation menu is the key to making your site more user-friendly. In this step-by-step guide, we’ll walk you through everything you need to know to create a navigation menu that not only looks great but also helps your visitors easily find what they’re looking for. Ready to get started? Let’s dive in!
What is a Navigation Menu?
A navigation menu in WordPress is a crucial element that helps visitors easily navigate your site. It typically appears at the top or side of your pages, linking to important sections like your homepage, about page, or blog posts. Think of it like a map for your website—without one, visitors might get lost and quickly leave. WordPress makes it simple to create and customize your menu, allowing you to add links to pages, or even external sites.
- Creating Your Custom Navigation Menu
- Creating Drop-Down Menus in WordPress
- Adding Custom Links to Your WordPress Navigation Menus
- Editing or Removing a Menu Item in WordPress Navigation Menus
Creating Your Custom Navigation Menu
- Login to your WordPress dashboard.
- Go to the Appearance → Menu page.
- Enter the name of the menu in the Menu Name field.
- Click the Create Menu button.
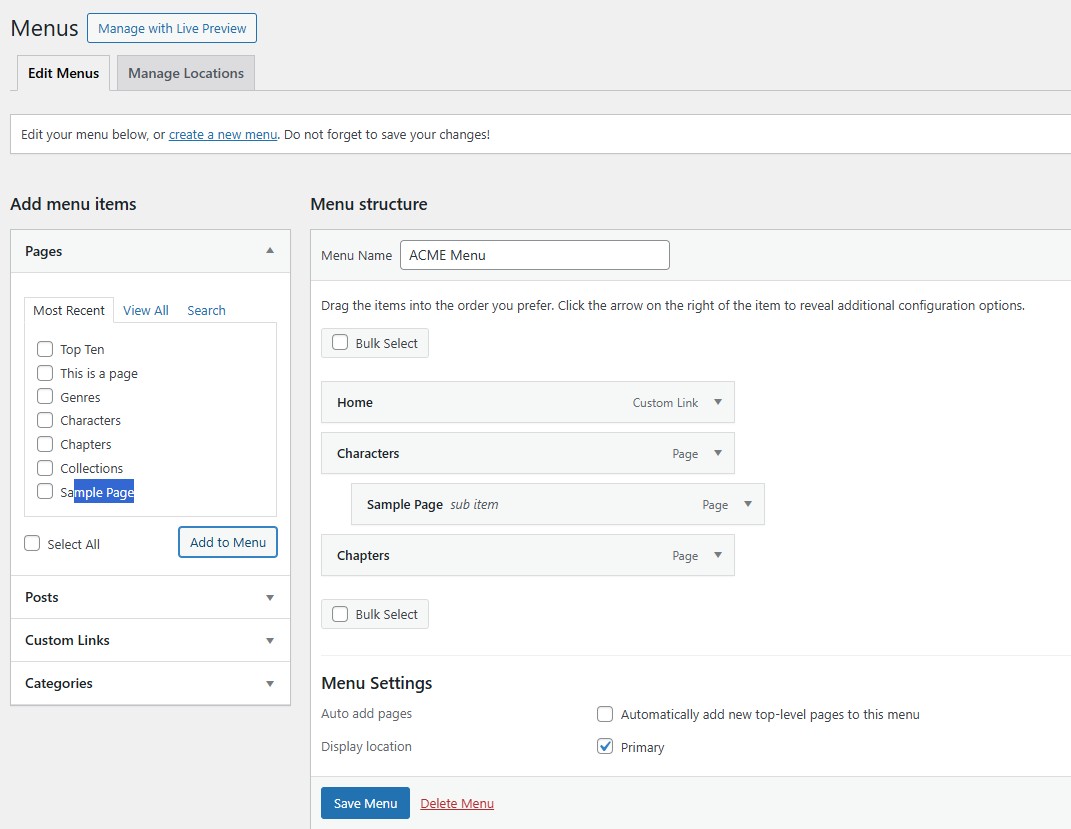
- Next, from the Add menu items column on your left, choose the pages you want to add to the menu by clicking on the check box next to each of them. You can either automatically add all new top-level pages or you can select specific pages from the left column.
- Click on the Add to Menu button.
- You can reorder the menu items by dragging and dropping them in the Menu structure section.
- In the Menu Settings section, make sure Primary is selected. This is the only menu location that is available for Toocheke and it appears at the top of the page (either above or below the header depending on the layout you have chosen).
- Click the Save Menu button.
Congratulations! You’ve successfully added a navigation menu to your website.
Creating Drop-Down Menus in WordPress
Drop-down menus, also known as nested menus, are navigation menus that feature parent and child items. In the Toocheke theme, when you hover over a parent item, a sub-menu will appear, displaying all the child items underneath it.
- To create a submenu, drag an item below the parent item and then drag it slightly to the right.

- Click on the Save Menu button.
Adding Custom Links to Your WordPress Navigation Menus
If you want to add links to external websites in your navigation menus, WordPress offers a simple feature called Custom Links. This allows you to easily link to your social media profiles, online store, or any other websites you own, making it a great way to expand your site’s navigation.
- To add a custom link, make sure the Custom Links tab is expanded in the Appearance → Menu page.
- Enter the link to the website in the URL field.
- Enter the label you wish to use for this item in the Link Text field.
- Click on the Add to Menu button.
- Click on the Save Menu button.
Editing or Removing a Menu Item in WordPress Navigation Menus
When you add a page to your menu, it automatically uses the page title for the link text. If you wish to change the text:
- Expand the menu item from the Menu structure section in the Appearance → Menu page.
- Change the text by updating the Navigation Label field.
- Click on the Save Menu button.
To remove the menu item:
- Expand the menu item from the Menu structure section in the Appearance → Menu page.
- Click the Remove link.
- Click on the Save Menu button.
And there you have it—your complete guide to adding a navigation menu to your WordPress site! This marks the end of our WordPress tutorial series for Toocheke theme and the Toocheke Companion plugin. Thanks for following along.
Happy Tooning!


